New Year, New You! (Isn’t that how every self-help magazine touts it?) Every time a new year rolls around, we feel we need to improve something about ourselves. Lose last year’s 10 pound weight gain, finally get that kitchen painted, clean out the garage/storage shed/closet. Ugh! What if I say New Year’s challenges don’t need to be so daunting or depressing, maybe you can challenge yourself to improve your photography!
So, in addition to SFNPCC’s 2026 quarterly photo challenges, I thought I’d give some ideas for personal projects or “challenges” that you can do for yourself. Maybe, if you’re open to the idea, you can share your challenge with the club? Perhaps at the end of your challenge, you can talk about what you did, the photos you took, and what you learned from it. You could do a talk or write a blog post about it. Or not. It’s up to you.
Sometimes we tend to fall into a routine. We go to the same places, we photograph the same things, and photograph them the same way, and process them with the same techniques. And don’t get me wrong, there’s nothing wrong with that as long as you’re happy with it. But if you’re less than thrilled with your images, looking to spice things up, or want to improve your techniques - maybe trying something new, or giving yourself a project or challenge might do the trick.
Perhaps you’re a beginner, or trying out a new genre, or are not as fluent in some aspect that you want to improve in. You know you need to practice your craft. Perhaps you need a little structure to make sure you GET regular practice, or to be sure you’re hitting all the topics necessary to be more fluent in whichever technique you feel you’re lacking. Giving yourself a project or challenge will force you to do the things you need to get those necessary hours of practice in or to practice those necessary techniques.
Some ideas are:
Image a Day
A daily, weekly, monthly, or quarterly “image challenge”. Perhaps you’re super motivated do a 365 day photo challenge, or (if you’re not so ambitious or have a lot of other things on your plate) try a photo a week, photo a month, or even photo a quarter. You do you, boo! This is YOUR project, you make the rules. But make rules for yourself that you can adhere to. If you work a high stress 60-hours a week job with a big family, perhaps a 365-photo challenge isn’t doable. Pick something you can do fairly easily, but still takes commitment and extra effort.
SPECIFIC SCENES
Perhaps you’d like to concentrate on specific conditions, time frames, or places. If you are into sunsets or sunrises, set a specific goal in capturing a certain amount of each. Perhaps you’d like to concentrate on the blue hour, or challenge yourself in not so great light, such as bright daylight or blah cloudy days. Perhaps you’d like to concentrate on a specific area, such as the beach, or woodlands, or marshes. Maybe picking a particular park, or specific location, or even city.
EXPLORE
Maybe you’re one who always goes to the same places, try expanding your range. Open up your favorite map app and pick places within a specific mileage range you’re comfortable driving and pick out places you’ve never been. Again, make an appointment with yourself to actually go and visit these places. You might find a new “favorite”!
GET TECHNICAL
Maybe you need to improve your post-processing skills. Set a goal to sit down and learn one new technique per week or per month, with your preferred software.
Maybe it’s an in-camera technique you need to learn or perfect. Same goes. Pick a technique, learn it either by reading about it or watching a video, and go out and practice it, a lot! Just reading or watching a video and doing it once likely won’t sink in, you’ll need to repeat it to make muscle memory of it. A great idea for a challenge.
In addition, maybe you’re finally ready to start your own website or clean up the one you already have. Its a great opportunity to learn new skills, and hone in the ones you already have. When its all finished, you’ll have something you can be super proud of!
NEW GENRE ANYONE?
Perhaps you’d like to dip your toe into a different genre altogether. Figure out what that is and make an appointment with yourself to spend time with that genre. It will feel uncomfortable at first, but that’s the challenge. Maybe try a new genre each month or quarter? By the end of the year you’d be a well rounded photographer for sure!
GET ORGANIZED
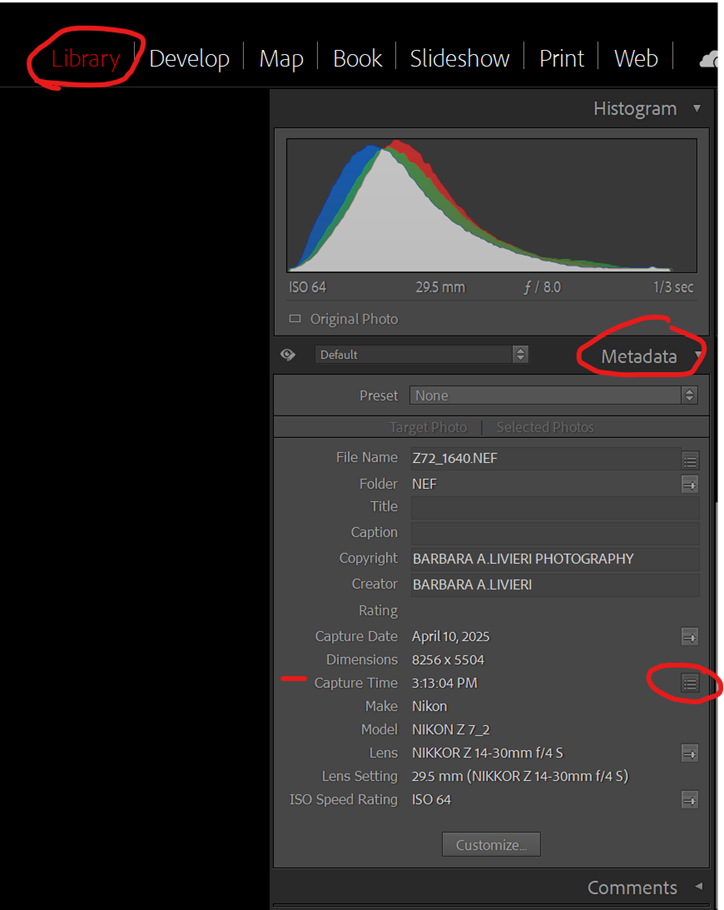
Maybe you need a spring cleaning challenge, and I’m not talking about a new bedspread and duvet for your bedroom! Do a deep dive into your photo library and take stock of what you have. Does it serve you? Can you easily navigate the folder structure, or is it one big ole mess? Now’s the time to finally get it organized. Make an appointment with yourself for a few hours per week to dive in and finally get it organized, whether it be into a creating a cohesive set of folders, updating keywords, creating collections, and utilizing star ratings and color labels. (Hint, the photographer I mention below has great tips on how to get organized too! Click HERE and scroll to the bottom for all of her great articles!)
Come up with your own challenge, or try one of these that I pulled from fellow photographer, Chrissy Donadi’s, website blog post from last year:
The possibilities are endless!
1. 365 Project: Commit to capturing at least one photo every day for an entire year. This daily practice will sharpen your technical skills, fuel your creativity, and teach you to see beauty in the mundane. Whether it’s a moody puddle reflection on a rainy day or the playful shadows cast by your morning coffee cup, this project encourages you to find inspiration everywhere. If 365 feels too ambitious, scale it down to a 30-day or quarterly challenge that still pushes your creative boundaries. Pro tip: Set a phone reminder to create a photo every day. And hey, life happens—so have a backup plan, such as a simple still-life setup at home, for busier days.
2. Golden Hours Project: Immerse yourself in the magical light of golden hour by committing to capture 52 sunrises this year (one per week). These fleeting moments of soft, warm light offer endless creative possibilities for landscape and nature photography. With each outing, you’ll refine your ability to work with dynamic light, compose compelling scenes, and anticipate the subtle changes in color and mood. Return to the same location to track how the light evolves with the seasons, or explore new spots to diversify your portfolio. If mornings aren’t your thing, make it a sunset project instead.
3. Four-by-Four Seasons Project: Dive into the cyclical beauty of nature by selecting four distinct subjects—trees, a pond, a mountain peak, or even a wildflower patch—and photographing each one in all four seasons. This 16-image collection will not only highlight nature’s transformations but also teach you how light, weather, and mood shift throughout the year. Use this project to hone your skills in observation and composition while creating a cohesive body of work that tells a story of change and resilience. Pro tip: Scout your subjects early to find the most compelling angles and compositions.
4. Monthly Location Deep Dive: Instead of seeking variety, immerse yourself in the subtle beauty of a single location over time. Choose one natural site and photograph it monthly for a year. This project emphasizes observation and patience, allowing you to document how light, weather, and seasonal changes transform the same scene. It’s an excellent way to develop a deeper connection with a specific place and refine your ability to notice intricate details that might otherwise go overlooked.
5. Local Landscape Documentation Project: Map and photograph 12 new locations within 50 miles of your home. This project focuses on exploration, helping you expand your knowledge of nearby landscapes while honing your skills in planning and adapting to unfamiliar environments. Use tools like PhotoPills or The Photographer’s Ephemeris to pinpoint the best shooting times, highlight seasonal features, and create a personalized guide to your local area. By the end of the year, you’ll have a curated portfolio showcasing the diversity of your local region.
6. Weather Watcher Portfolio: Challenge yourself to capture the drama and beauty of nature’s mood swings by building a collection of 12 striking images that showcase diverse weather conditions. Seek out foggy mornings, snowy forests, rainstorms, or fleeting moments of sunlight breaking through clouds. This project teaches patience, timing, and adaptability as you work in less-than-ideal conditions, pushing you to embrace nature’s unpredictability. Along the way, you’ll develop a portfolio filled with atmospheric images that convey the powerful impact of weather on landscapes. Pro tip: Pack weather-appropriate gear to stay comfortable and keep your equipment safe.
7. Timelapse Challenge: Dive into the mesmerizing art of timelapse photography by creating one timelapse sequence for each season. Whether you’re capturing the movement of clouds, the gradual bloom of wildflowers, or the shifting light of a sunset, this project teaches you to observe and plan for changes that occur over time. Experiment with settings, intervals, and locations to bring motion and transformation to life in your images. By the end of the year, you’ll have a dynamic series showcasing the rhythm and beauty of nature’s cycles.
8. Night Sky Navigator: Dive into the wonders of astrophotography by capturing the night sky. Throughout a season, create a series showcasing the stars, moon phases, or meteor showers. Start with the basics of long exposures and progress to advanced techniques like stacking or tracking for pinpoint star clarity. Planning is key—use apps to predict clear skies and celestial events. The result? Images that showcase the beauty of the cosmos and your newfound skills in low-light photography.
9. Technical Skill Builder: Dive into advanced techniques to expand your creative toolkit. Each quarter, focus on mastering a challenging skill, such as focus stacking, exposure blending, or long exposures. Experiment with alternative methods like intentional camera movement or in-camera double exposures. By the end of the year, you’ll have a solid grasp of advanced photography techniques—and perhaps a few surprises in your repertoire.
10. Master Manual Mode: Dedicate one month to shooting exclusively in manual mode and take full creative control of your photography. Adjusting aperture, shutter speed, and ISO manually might feel daunting at first—like learning to juggle—but it’s the key to unlocking your artistic vision. Keep a journal of your settings, outcomes, and lessons learned. As you master manual mode, you’ll gain confidence in your ability to handle any lighting condition and achieve your desired look, making creativity the focus rather than your camera’s automation.
11. Focal Length Project: Spend one month shooting exclusively with a single lens, exploring its full creative potential and the various perspectives it can produce. Whether it’s a prime lens or a versatile zoom, limiting yourself will encourage problem-solving and fresh perspectives. Can’t zoom in? Move closer. Need a wider shot? Step back (or awkwardly crouch in the bushes—whatever works). By understanding your lens’s strengths and limitations, you’ll develop a deeper connection with your gear and discover unique ways to frame the world. Bonus: you might fall in love with a lens you rarely use.
12. Composition Challenge: Master the art of visual storytelling by focusing on classic composition techniques. Over a month or longer, create images that explore leading lines, the rule of thirds, symmetry, negative space, and other compositional methods. Develop a mini-portfolio showcasing how each approach enhances your storytelling. This structured practice builds a strong foundation and ensures your images captivate the viewer.
13. Macro Garden Project: Transform your patio or windowsill into a miniature photography playground with a macro garden. Start by cultivating potted plants, flowers, or herbs and use them as subjects for your close-up photography. Experiment with capturing intricate details like leaf veins, water droplets, or flower textures. Bonus: You’ll not only have stunning photos but also a lovely garden to enjoy. Just be prepared to explain your early morning tripod yoga sessions to curious neighbors!
14. Intimate Landscape Portfolio: Turn your lens toward the hidden beauty of nature’s smaller scenes. Instead of sweeping vistas, focus on textures, patterns, and details—like frost on a leaf, the interplay of light on tree bark, or moss glowing in golden-hour light. Commit to building a 12-image series that celebrates nature’s quiet moments. This challenge sharpens your eye and helps you uncover beauty where others might overlook it. It’s like nature’s version of Where’s Waldo—but prettier and without the red-and-white sweater.
15. Black & White Nature Series: Strip away color to focus on the fundamentals of form, texture, and contrast. Create a 12-image portfolio of black-and-white nature photography that highlights the play of light and shadow in the natural world. For an immersive experience, change your camera color settings to monochrome so you can visualize tonal contrasts and compositions directly from your viewfinder. This hands-on approach will sharpen your ability to see in black and white and uncover striking photographic possibilities.
16. Portfolio Building Blocks: Create three cohesive mini-portfolios of 5–7 images each, with each series centered on a specific theme, such as water, forests, or textures. This exercise hones your ability to curate a collection and ensures every image contributes to a unified narrative. By the end, you’ll have three distinct bodies of work that reflect your creative vision and versatility as a landscape photographer.
17. Photography Journal Practice: Develop the habit of keeping a private photography journal to document your creative journey. Record technical details like camera settings and shooting conditions alongside personal reflections on your inspirations, creative process, and lessons learned. Celebrate small victories and embrace the occasional misstep, as they all contribute to growth. Over time, your journal will become a cherished resource that reveals your evolution as a photographer.
18. Photography Book Club: Immerse yourself in the wisdom of great photographers by committing to read one photography book each month or quarter. Begin with technical guides to refine your skills, then balance them with coffee table books showcasing inspiring images. Let the insights of seasoned photographers shape your understanding and spark new ideas for your work. Better yet, form a book club with fellow photographers to exchange thoughts and perspectives—it’s a great way to stay motivated and uncover new creative approaches. Find some great photography books to start here.
19. Post-Processing Power Hour: Dedicate one hour each week to mastering new post-processing techniques. Focus on a specific skill each month—whether it’s luminosity masks, focus stacking, or perfecting color grading. If you’re already comfortable with the basics, dive deeper by experimenting with editing for mood or refining your workflow. By regularly challenging yourself, you’ll not only elevate your editing skills but also develop a unique creative style.
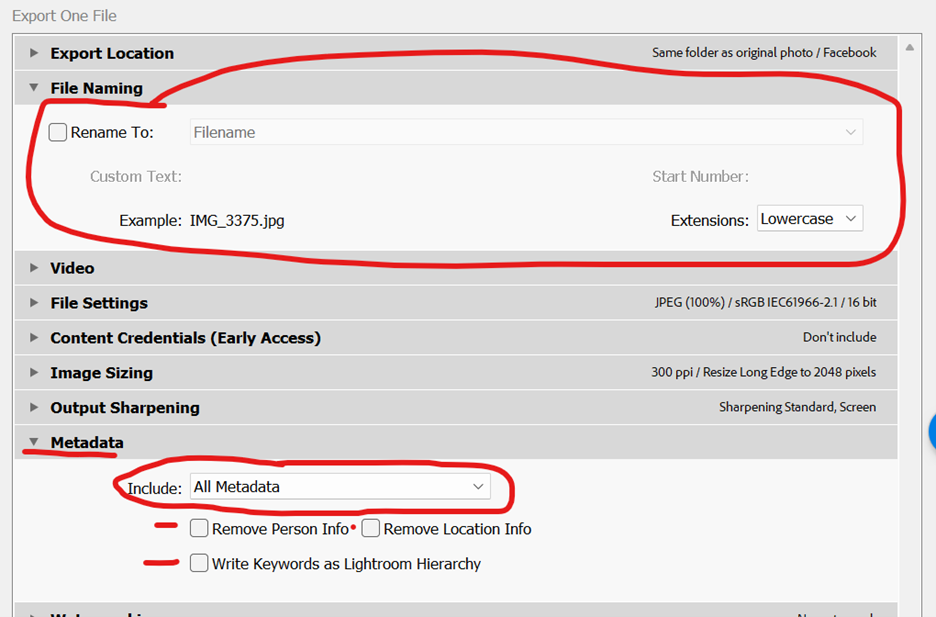
20. Workflow Mastery Project: Take time to design and document your ideal post-processing workflow. From importing and culling images to final edits and exporting, map out each step in your process. Test and refine it until it feels efficient and intuitive. Then, solidify your learning by teaching your workflow to another photographer. Explaining your process will highlight areas for improvement and deepen your understanding of your own creative routine.
21. Photo-to-Print Challenge: Holding a physical print lets you experience your work in a way screens never can. It’s a game-changer for growth. Print at least one image every month. Experiment with different papers, sizes, and printing techniques to find the best presentation for your style. Consider compiling your prints into a themed photo book or calendar as a tangible record of your progress. Holding a physical print is an unparalleled way to connect with your work and see your growth as an artist.
22. Local Conservation Connection: Partner with a local conservation group or environmental center to document their efforts and the beauty of their protected areas. Use your images to raise awareness, create impactful visuals sharing their message, or even collaborate on an exhibition. Not only will you contribute to a meaningful cause, but you’ll also build a body of work that reflects the unique relationship between people and the environment.
23. Mentorship Connection: Enhance your growth by either finding a mentor or mentoring a beginner photographer. A mentor can provide invaluable insights, helping you refine your vision. Alternatively, teaching a new photographer encourages reflection on your own process and can reveal overlooked strengths. Plus, sharing perspectives often inspires fresh approaches to your craft.
24. Sharing Your Process: Create content that shares your photographic process with others, from the moment inspiration strikes to the finished image. Use blogs, videos, or social media posts to highlight your planning, decision-making, and editing workflows. Don’t shy away from discussing challenges and how you overcame them—it’s this authenticity that builds connection and credibility. This practice not only helps others learn from you but also deepens your mastery of your craft.
25. Publication and Writing Project: Challenge yourself to submit at least one photo or article per quarter to a nature photography magazine, blog, or online publication. Photo essays, in particular, allow you to tell a compelling visual story while honing your narrative skills. Each submission is an opportunity to grow, receive constructive critique, and develop your portfolio as a storyteller. Some great places to submit your work are Nature Vision Magazine by the Nature Photographers Network, Elements Photography Magazine, or Lenswork.
Good luck and Happy New Year!