

I have been reviewing all of your 12-months of Everglades submittals and renaming the files so I can keep some semblance of order going forward. To do so, I’ve had to look through each image’s metadata to figure out when each image was actually taken. I’ve found that some of you aren’t exporting your images with that metadata available. (Don’t worry, it’s an easy fix.) But I need to know and verify when you actually took the photo. Not when you edited it, not when you sent it, nor when I saved it, I need the actual date and time of capture.
This got me thinking of ways we can keep order within our own photos that maybe we haven’t thought of, myself included.
First off, everyone should make sure their cameras are set to the correct date and time. I know, seems like a no-brainer, but incorrectly capturing the wrong time happens more than you think. Even to me! Yes, even to me. 😁
Generally, you set the date and time when you first set up your camera, but some folks get super excited with a new camera and forego the boring setup and go directly to taking photos. I get it. But at some point, you need to properly set up your camera. And that doesn’t end there, you will likely have to change it twice a year to coincide with the time change, and if you do any traveling out of the time zone, you’ll have to do it then too.
So let’s start in your camera’s Menu, Setup Menu. Scroll down to find Time zone and date (this is from my Nikon, yours will be similar)


As you can see, I’m negligent as well (see below). My camera is still in Vancouver Island time (left) Pacific time zone. I fixed it in the right panel. Just by doing what the camera says. I used the right arrow over, and clicked “ok”.


Once the time zone is correct, make sure the date and time are correct. I usually double check with my automatically-updated smartphone, it SHOULD have the correct info. Adjust your camera if necessary. And then don’t forget to check that you have the daylight savings time on or off. This has messed with me in the past.


Now, if for some reason you forget to set the correct date and time, and you go out and shoot a bunch of photos in the incorrect date and or time (like I do on every trip), you can change it in Lightroom after the fact. Matter of fact, when I arrived in Vancouver I didn’t change my time zone for three days and each day I uploaded images, I had to change the capture time. It’s a quick fix.
To do that, go into Lightroom, and Lightroom’s Library module. On the right side, go to Metadata as shown below.
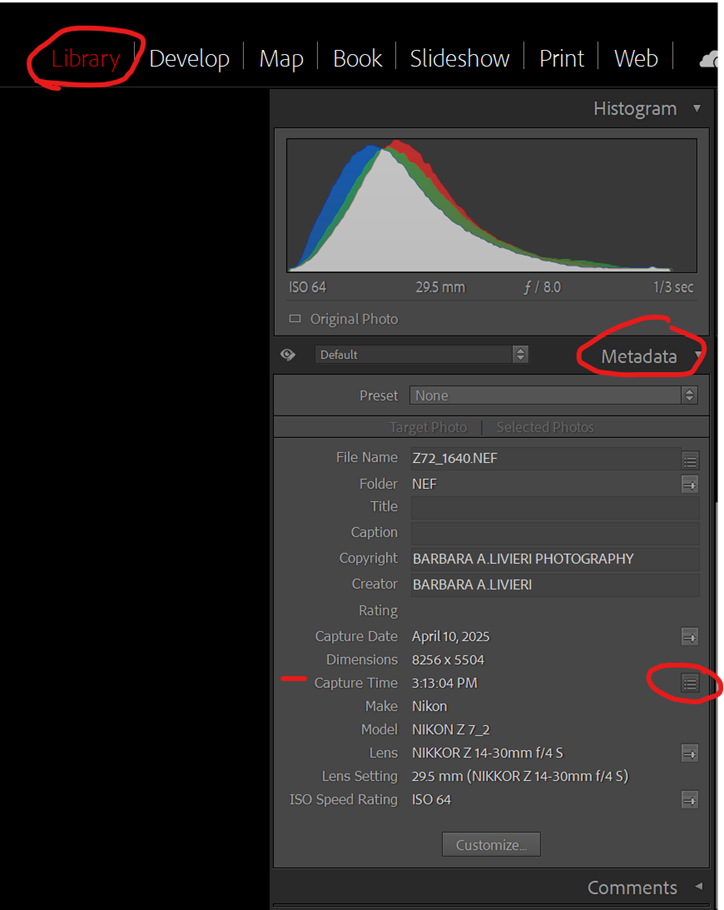
Look for Capture Time (shown above). When I originally took this, my camera was still set to Miami time (Eastern Time Zone) so it said “6:13PM” and I knew I didn’t take this image at 6:13pm, so I had to fix it. And not just this one image, ALL the images in this newly-imported folder were off by 3 hours. So I selected all the images in my filmstrip, then clicked the box to the right of the capture time (as shown above), and the below dialog box pops up.

Click the Shift by set number of hours (time zone adjust) radial button (see above).
Then where circled (above), either add or subtract the number of hours to get to the correct time. I had to do this when I went to Paris as well. In that case, I had to +5 hours. When you’ve selected the correct adjustment hours, click “change all”.
And at the bottom where it says “This operation cannot be undone.”, that’s ok, and it’s true, you can’t undo it, but it can be readjusted if you’ve chosen the wrong number of hours. So don’t let that scare you.
Now, if you’re one who hasn’t set up their camera yet, like since you bought it, you may have to use the first radial button in Type of Adjustment, Adjust to a specified date and time. When I used my OLD OLD OLD Olympus camera after several years of it sitting with no battery, I had to do that because my camera had no idea what the correct date was and reverted back to the factor setup, Jan. 1, 2004 (the actual capture date was May 4, 2019). So yeah, that was wrong and I had to edit each image accordingly. In that case, changing the date was easy, but for the correct time, I had to guess on most of them.
If you didn’t realize, your camera is basically a small, light-recording, computer. Every setting on your camera will be embedded in your image file’s metadata.
If you’re one of those who hasn’t properly set up their cameras, I highly recommend searching the world wide web, or YouTube, for your exact camera’s make and model number and ‘setup’. And then read or watch how others set up their camera. There are tons of videos explaining pretty much every camera system out there.
Its not just about setting the date and time, there are other things that need to be setup. For instance, when I bought my Nikon Z7II, I now had 2 Nikon Z-mount mirrorless cameras. (A Z6 and Z7II) How was I going to differentiate the two? So I decided to have my camera rename the files for me at time of capture, IN CAMERA. To do this, I added a prefix to the file naming convention IN-CAMERA to reflect which camera I used. If you scroll back up to my screenshot of the Metadata in Lightroom, my filename is Z72_1640.NEF. The camera named the image 1640, but I added the Z72. And that signifies to me by just looking at the file name that I shot this image with my Z7II camera and not my Z6. The setup instructions for your particular camera make and model will explain how to do that if you choose.
In the meantime, I urge everyone to go into one of your exported image folders (where you save previously edited and exported photos). Right-click on one of the image files and go to the “Properties” menu. Below, I show the properties panel for one of my images on my work computer, which is a PC. Apple’s or Mac’s I’m sure will have some sort of similar information area. If you have one, I’m sure you know how to find it.
In the following screenshots, I’ll go over each tab and the information it shows.


The first panel, is GENERAL, which basically shows the file information as it resides on your computer. The dates created and modified, as shown here, only refer to that FILE not the image itself. The second panel is SECURITY which shows the different permissions to access that particular file. I rarely deal with this.
Details Tab (below)
It’s in the “Details” section that I most want you to concentrate. Below I have 4 screen shots as there is a lot to scroll through.
In the first block (left), you’ll see the Description, the Origin (this is a very important section) with the DATE TAKEN and copyright information. The Image section can be very useful as well, with dimensions in pixel sizes and bit depths. Below that is the Camera info, showing the make and model of the camera used and all the EXIF data.


As you can see above, the information my image tells me in the properties-details tab says this: I took this image on April 17, 2025 at 9:51am. It shows I edited it or exported it from Adobe Photoshop Lightroom, my copyright info is there, the image is 1638 pixels wide and 2048 pixels high, the resolution is 300 dpi, bit depth is 24, the color space is sRGB, it was taken with a Nikon Z72 camera, at F-16 aperture, 1/6th of a second shutter speed, and the ISO was 320, and it was shot at 290 millimeters, with the spot metering mode. That’s a lot of info! Just from right clicking on a jpg image. Amazing, huh?
In the panels below we see the Advanced photo section (left panel), which is dependent on what kind of camera you have and what kind of data it records (to be honest, not sure where that info comes from. Possibly entered into the camera’s metadata during setup). Not important here.
And finally below that (right panel) is the File information. This basically shows you when this file (not the actual photo) was created, meaning when it was exported, or maybe when it was downloaded. In my case, I downloaded this from my Dropbox files to my work computer on May 8th. In my same exported image file on my home computer, it shows different information with different dates (different computer).


Now, to have your files show the proper information in the above panels, you must export it properly from Lightroom or Photoshop. The following info is an explanation on how to export it properly.
EXPORTING
Below is a screenshot of the Lightroom export dialog box. In it, I highlight 2 sections; File Naming and Metadata.
File Naming can be helpful for certain exporting situations. Such as our 12-Months of Everglades project. In it, you can actually tell Lightroom to rename the file. Perhaps you want the image name to reflect when and who took it. You might change the file name to April (you choose which month) BAL (or insert your own initials) and the photo title or description (if using the example below, I could call it April BAL 3375 to keep the original file name in there as well.)
You can have your file name say whatever you want. You don’t have to stick with the file name that your camera gives you. Matter of fact, when I enter into any photo competition, or submit an image for photo review, they generally have specific requirements for pixel sizes as well as how to rename them. When I export for such an event and I expect to export more, I will save that as an export preset to use for future images.
To “rename”, just click the check box “Rename To:” and add the name you want to call it in the Filename box.
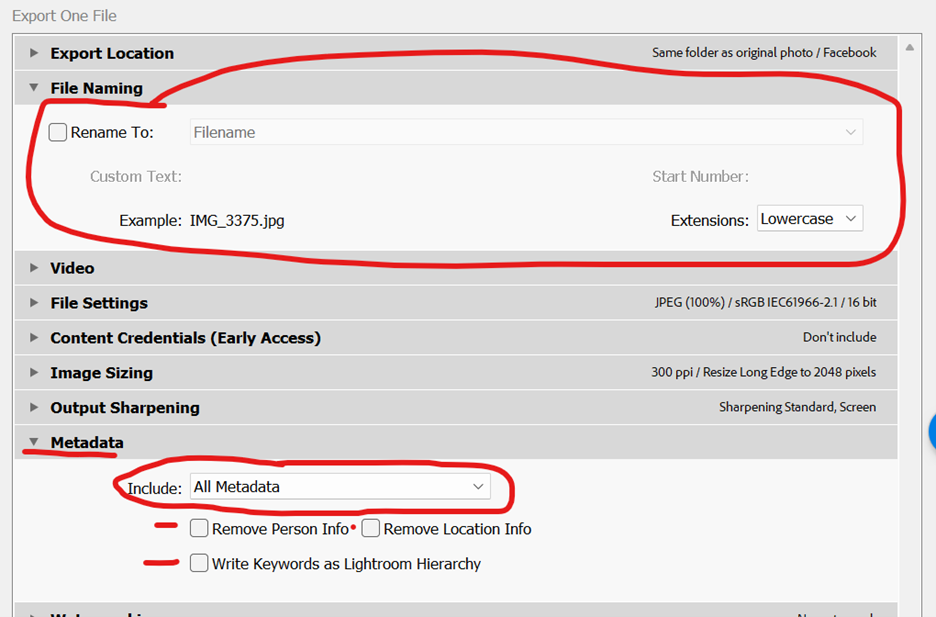

Now, for the above Metadata section (to show info as the above properties panels), this is where you decide which metadata you want to keep in your exported image. You would click on the dropdown menu and choose. In the case of our 12-Months of Everglades, I want to see ALL of your metadata.
But there will be other times where you might want to restrict data that is exported with your image. Perhaps you’re sharing an image and you don’t want the location shared (if your camera even records GPS, it may not – however cell phones do). Maybe you don’t want your personal data to be shared, if it’s supposed to be something anonymous. Maybe you ONLY want your personal data to be shared, so people know where to contact you for any reason about your image. Maybe you don’t want anyone to know your EXIF data – say you’re creating an instructional package and don’t want to give out exact EXIF for people to copy, you want them to figure it out on their own. For whatever reason, you get to choose which data gets saved to the file.
Like I said, there can be many reasons why you’d choose one option over another. In the case of you sharing your images with me for camera club purposes, the files aren’t going anywhere beyond me. Purposely restricting data looks like you’re hiding something, which I’m sure is not intentional. But in many of your cases, I’m guessing many of you didn’t realize that you restricted info when you exported your image. This is why I’m sharing this with you now. Personally, I ALWAYS keep it on “ALL METADATA”. I might change that when I start exporting my images for my website, but social media compresses your images and removes much of this data so you don’t have to worry about sharing too much.
I know this is a lot of technical information at once. If anyone has any questions, please don’t hesitate to message me, send me an email, etc. I’ll be glad to help. If you’re totally lost, we can even hop on to a quick Zoom call, just you and me ,and I can help you out.
Hope this helps!